Showing posts with label DIY. Show all posts

Tuesday, March 26, 2013

day 142

Lots of changes and little time to update can only mean one thing - it's time for an iPhone photo dump!

1. Tile work in the master bathroom shower has begun.  I think they started last Wednesday and currently have the floor and half the walls complete.  The photos below are from Sunday.


Since these were taken, they've laid the floor (rectangular mosaics) and hung the diagonal square tiles above the small pencil edge tile.  Can't wait to see it finished!

2. Granite was installed in the master bathroom last Friday.

[Vanilla Ice granite counters]
And I don't totally love it.  Which makes me sad.  I'm hoping that once the additional shelf is installed in the middle of the vanity and the plumbing, mirrors, lights, etc. are added, I'll like it much more.  I had really wanted a neutral granite that didn't make a big statement and, right now, this is a bit bolder than I had originally hoped for.  I'm sure the fact that it's currently the only pattern in the room does not help.  Nor do the cardboard-covered floors.

Also, we had to make a last minute change on our faucet locations.  They were originally supposed to be offset, at an angle, on the outside corners of the sinks.  We received a call from the granite folks the morning they were to install, letting us know they'd just gotten a complaint from the last vanity they did that way.  Apparently, water keeps splashing out of their sinks.  In favor of function over design, we decided to mount the faucets as normal, centered along the backs of the sinks.  I'm just bummed now that we didn't go with the rectangular sinks.  Unfortunately, by the time they'd received the complaint and called us, the sink holes had already been cut for the oval bowls.  Oh well.  I was just grateful to find out about the splashing issue before they'd cut the faucet holes.

3.  And granite was also installed in the main bathroom.

[Coffee Brown granite counters]
There is more brown in the stone than the photo is pulling.  And as nervous as I was about the dark color, I really like it.  Phew.

4. We finally got around to painting our Craigslist dresser this weekend.  After much debate, we opted to do a charcoal top with a medium grey base and drawers.  The contrast is definitely greater in person than the photos are showing.  More details to follow on this project.


5. After a ton of browsing, I think I finally found a shower curtain that will work for the main bathroom.  I really want something kid-friendly, but classy.  And it's been amazingly hard to find!


The shower curtain was found at Tuesday Morning ($16) and I think I'll need 2 yards each of the navy and green fabrics ($3/yd).  So, for $28, I should have a shower curtain I love.  Hopefully!

6. I also found hardware for the master bathroom vanity!  I don't know if they're new to Lowe's, or if I've just never noticed them before, but we finally decided on using a combination of knobs and pulls.


7. I found a mirror that I love for the main bathroom.  But I think it's a little too large.  And I think something rectangular would probably fit better.  The one below is from Hobby Lobby, but I'm wondering if we could make our own if we bought a plain beveled mirror and then trimmed it out with some painted and distressed molding?


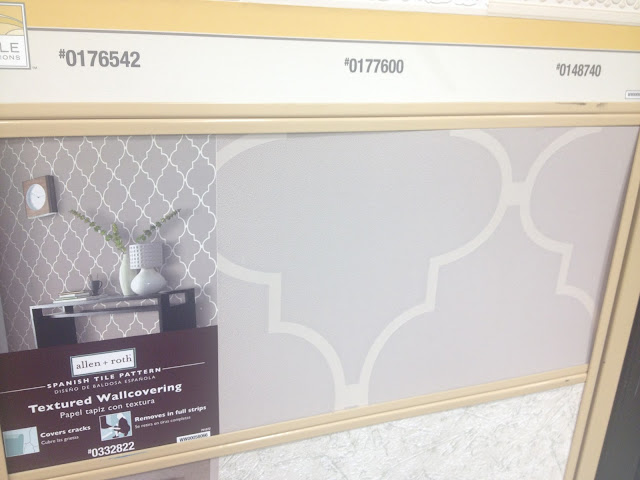
8. We might have decided to wall paper the wall behind the toilet.  Or maybe the powder room.  And, yes, I swore I'd never use wallpaper in my life.  Especially after living in this highly wallpapered condo.  But isn't it pretty?


9. Weren't my boys handsome in their St. Patty's Day attire?


10. The electricians are coming out on Saturday to wrap everything up!  We're going to have them install one more light outside of the powder room/by the drop zone.  We've noticed it's a bit dark at night and figured we might as well have them take care of it now.

11. The new bathroom vanity cabinet should be delivered tomorrow or Thursday.  Can't wait to have it installed and to finally be able to check cabinets off the list.

12.  The plumber was supposed to start working Monday but we haven't seen him yet.

13.  Unlucky number 13.  We stopped by the house this weekend to drop off our kitchen faucet and a replacement light fixture that had been purchased broken.  In the time it took us to walk into the house and quickly drop off/check for updates, E discovered the latest project.  They'd filled our master shower basin with cement.  And it was fresh.  I'm sure you can imagine what happened next.  Hubby worked hard to smooth everything out while I cleaned up the kid and his less than two-hours old shoes.  Breath in.  Breath out.  

The countdown is on....20 days to go!

Thursday, March 21, 2013

staying organized.

I'd like to think that I'm not the only one in paperwork overload during this building process.  Between multiple floor plan revisions, cabinet plans, electrical plans, inspiration photos, draw requests, change orders, price comparisons, shopping lists...and on and on and on...I was feeling quite overwhelmed.  I'm one of those people that is very organized in some aspects of my life, but not others.  My pantry and cupboards are usually well organized, labeled and clean.  The pile of mail on my counter, not as much.  I swear, my mail must reproduce overnight. And now that we're adding school projects and newsletters to the mix, it's just out of control.  My goal for the new house is to conquer the mail mess.  I'll let you know how that goes.  Ha!

Anyway, I finally decided to take control of the building paperwork craziness and started a construction binder.  It's been a lifesaver and I actually wish I'd started the thing about four months before I did.  No more wondering if I have the most recent floor plans or digging through piles for the receipt I need to return a broken light fixture.  Such a nice feeling.


If you'd like to make your own, I'd recommend the following materials: heavy duty 2" binder (although, my first one is almost full and I'm about to start on binder number two), sheet protectors, 3-hole punch and  your preferred tabs or dividers (I personally like these by Post-it).

I'm a big fan of using sheet protectors for most of my documents because it just keeps everything protected.  Plus, I can slide papers in without needing to find my hole punch.  For my checklists, notes, drawings and other things that I actually write on, I do tend to use the 3-hole punch.  The only downside to sheet protectors are that normal sized dividers (like these by Avery) can get 'lost' in the binder because the sheet proectors stick out farther than a normal, hole-punched piece of paper.  It's all about personal preference.

And, because I couldn't put together an organizational binder without making it pretty, I created a set of dividers, worksheets, checklists and other helpful tools.  The best part?  You can use them to make your own binder pretty, too!  At my Hubby's encouragement, they're now available for purchase through Etsy.


If you're interested, you can check out the details here, on the lot23home shop.


And the second best part?  I've decided to give away a set of printables!  Just comment on this post with your name and e-mail address and I'll pick one winner (using a random number generator) on Monday, March 25.  All entries should be submitted by Sunday, March 24 at 11:59 pm CST.  If the chosen winner does not acknowledge my e-mail, another winner will be selected one week later (April 1). 


The worksheets would also be helpful for home remodeling projects or even planning for a future building project.  If you're interested, but would prefer the cover sheet say something other than 'construction', just send me a note!  The Etsy site also helps you get an idea of the different categories I used to divide my binder.


I've also used Excel and Pinterest to help myself stay organized.  All of my financial worksheets are in Excel.  It's easier for me to update an electronic worksheet when comparing loans, updating interest rates or even keeping track of change orders.  Plus, I'm a total Excel nerd.  Spreadsheets make me happy.

Pinterest (see my house boards here and here) has been awesome when we've been scouring websites, debating light fixtures, selecting faucets or even just saving things we'd like to purchase later.  It's also been a great place to save links to the selections we've made, so that I can access them anywhere via the Pinterest app on my phone, and not just when I'm not lugging my binder around.

Now, I'd love to know what other house building organizational ideas you have, as well as any tips to help me conquer my mail problem.  And don't forget to enter the giveaway - remember, it ends on Sunday and the winner will be announced Monday.  Good luck!

Wednesday, February 6, 2013

kitchen remodel

I fell in love with our first house the first time we walked through it.  But not as it was.  I fell in love with the vision of what it could become.  As I was walking through, I was already starting the mental to-do list of the various projects that would make the house a home for us.  The first item was the biggest.  The kitchen desperately needed updated. Popcorn ceiling? Check.  Outdated light fixtures? Check. Wood paneling? Check.  Ugly cabinets? Check.  Odd hardware? Check.


[north wall]
[south wall]
[above stove cabinets]
[above fridge cabinets]
[large drawers]
[tall upper cabinets - what is up with the handles, though?]
[solid cabinets]
We started making the to-do list before we'd even signed the papers to buy the house.  Lucky for us, my father-in-law is a woodworker and was able to help us with the hard stuff.  We decided right away that the cabinets were solid and it would be more expensive to purchase new than to fix up the old.  I really wanted cherry cabinets, though.  So, my FIL came up with the ingenious idea to reface the cabinets with cherry veneer and then order new doors in the style I preferred.  Once we decided on that plan, the list below was born.

1. Remove paneling.
2. Patch plaster walls.
3. Scrape popcorn ceiling.
4. Skim coat ceiling.
5. Replace light fixtures.
6. Remove shelf paper.
7. Paint cabinet interiors.
8. Reface cabinets.
9. Install new cabinet doors.
10. Build new cabinets for south wall.
11. Build new drawer boxes.
12. Replace laminate counters with solid surface countertop and flush-mount sink.
13. Replace sink faucet.
14. Paint walls.
15. Paint trim.
16. Purchase new stainless steel appliances.
17. Replace blinds and curtains.

We basically ended up replacing or refinishing everything except the tile backsplash and tile floor.  Hubby and I did the prep work of scraping the ceilings (the key is lots of water - we found a garden sprayer worked best!), removing the paneling, patching the walls and removing all of the doors.  We hired a guy off of Craigslist to skim coat the ceiling and I'm so glad we didn't mess with it.  For $100, we got a super smooth finish without hours of frustration.  Instead, I spent hours scraping shelf paper and applying 2+ coats of white paint to the cabinet interiors.  It was a pain to work in such small spaces and I think my forearms were coated in white paint for at least a week.


While we were busy deconstructing, my FIL was busy constructing new cabinets, re-configuring our counters and sink (we'd purchased a 'reject' and were able to trim/piece it together to fit our kitchen - the beauty of solid surface!), building new drawer boxes, staining veneer and trim and fighting with the door supplier over the quality of our first shipment of doors.

By the time we'd wrapped up our work, he was ready to come up to help with the next phase.  With the help of my brother-in-law and Hubby, my FIL completed the cabinet and countertop overhaul within a week (while also working on the other random projects I had for him throughout the house).  He also helped replace the faucet and change out our light fixtures.  It was a learning experience in DIY for both Hubby and I and we were so thankful to have someone to show us the ropes, so to speak.  I really can't thank him enough for his help and expertise.


The finished project was more than I hoped for but ended up costing less than we'd expected.  Our budget was $5000 and the rough break-down included:
  • 'Scrap' solid surface counter and sink purchased from cabinet shop - $1000
  • 4-piece faucet (from Lowes)- $160
  • Solid cherry doors and cherry veneer - $800
  • Stain, wood, glue, hinges, drawer glides - ???? (donated by my FIL)
  • Frigidaire microwave, oven and refrigerator (from local appliance store) - $1800
  • (2) light fixtures (from Menards) - $120
  • Wall, trim and cabinet paint (from Lowes) - $75
  • Cabinet hardware (from Lowes) - $125
  • Garden sprayer - $10
  • Labor to skim coat ceiling - $100
  • Asbestos test before we scraped the popcorn ceiling - $25?
  • Faux-wood blinds (from JCP) - $120
  • Curtains - ???? (made by my Mom)
  • Grand Total = $4335


[blinds not yet replaced]
The first three photos were taken by our Realtor when we sold the house just recently.  The bottom three photos were taken right after we'd finished the remodel. As you can see, we really didn't change much in six years.  If I were to re-do anything today, I might swap out the light fixtures again and I'd definitely update the art above the table.  And, while I'm dreaming, it'd probably be time to update the tile on the floor, as well.  Maybe I should e-mail the new owner and tell her to get on it?

If you happen to be looking for an update on the new house - it's day 94 and we have heat!  The drywall scraps are cleaned up and it looks like they're getting ready to start the taping and mud process.  Also, we officially decided to have the main bath, master bath and kitchen/dining area painted professionally. Such relief.

Monday, February 4, 2013

day 92

It's Monday.  And I'm scatterbrained.  And I'm not in the mood to write proper sentences or use correct grammar.  Therefore, it's time for a list.

1. I met our Construction Manager at the house during lunch to talk through what's to come, go over placement of our master bath mirrors and resolve an issue the drywall crew left behind.  He told me that they should be adding the attic insulation today or tomorrow and then they'll start heating the house up to finish the drywall work.  Also, the siding is finally done along the garage!  They just need to finish the trimwork on the porch and box in the columns.

2. We ordered our kitchen faucet last week and are getting varying estimated ship dates.  Hopefully it ships sooner rather than later.  We finally decided on the Pfister Wheaton in a stainless steel finish.  We're not going to install the soap dispenser because the one at our old house never worked properly.

Pfister Wheaton faucet from build.com
3. We also ordered our dimmers and fan controls last week.  I can honestly say they were some of the least exciting things to pick out so far.
[images from Pro Lighting]
Left to Right: Lutron 3-way Fan Control, Lutron Fan Control & Dimmer, Lutron 3-way Dimmer

4. I had a wall texture crisis today.  I'd really prefer a smooth drywall finish.  I personally think it looks cleaner.  However, it's expensive.  And I've spent a lot of money on other upgrades recently. So, we're sticking with texture.  But I don't remember what texture.  Aye.  The Builder is going to confirm with me tomorrow.

5. Our house cleaner comes tomorrow.  I have no desire to finish picking up the condo.  Or to go to the bank for cash.  But I'll be glad for it tomorrow night.

6. Have you seen the IKEA Rast side table?  It's unimpressive on it's own but there are some amazing hacks out there.  I'm seriously considering trying to replicate a couple of these.  Could be fun, no?

[Rast Side Table by IKEA]
[Rast side table hack by A Charming Nest]
7. Our cabinets are now scheduled to be delivered next Thursday or Friday.  I'm hoping for Thursday.  Happy Valentines Day to me!  I'm so ready to see them installed.  Not sure if I'm more excited about the kitchen or master bath vanity.

8. I still need to order our cabinet hardware.  I have the kitchen knobs and pulls picked out but I'm still not sure what I'm doing in the bathrooms.

9.  I also need to order toilet paper holders and towel bars/hooks/rings.  I'm leaning towards the Sussex line at Pottery Barn but I'm still on the lookout for something cheaper but still high quality.  We've been to Lowe's and Menards.  Maybe Home Depot will come through for us?

[Sussex Towel Ring by Pottery Barn]
[Sussex Paper Holder by Pottery Barn]
10. That's all I have but it seemed weird to end a list on 9.